Advanced Manual Installation
Installing Individual BAMF Modules
This page is intended for advanced mappers who already know how to use Hammer, install custom content, and understand basic compile theory. If you're not sure whether this applies to you, consider following the Basic Installation Guide first and then returning here.
-
Look through the Features and decide which modules you would like to install. Note that some modules have requirements.
If you followed the Basic Installation Guide, then you already installed the FGD, VMFs, and Prefab modules. -
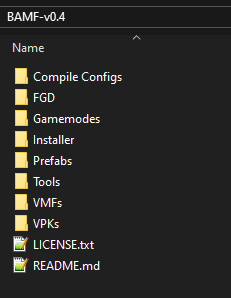
Download the latest version of BAMF from TF2Maps.net. The content of the .zip should look like this:

- Follow the individual installation and usage instructions below.
VPK Module
The "VPK" module currently consists of two .vpk files and a loose folder. This is because the loose folder (Extra Materials) needs to be packed into the map, and CompilePal currently cannot read VPKs. This makes packing assets into VPKs a consistent method of assuring game files don't accidentally end up inside your map file.
- Installation:
Paste the content oftf-bamf/VPKs/intoTeam Fortress 2/tf/custom/.
A correct path would look likeTeam Fortress 2/tf/custom/BAMF FGD Assets.vpkorTeam Fortress 2/tf/custom/BAMF Extra Materials/materials/tools/toolshint.vmt.
See the Features page for more information on what each sub-module contains.
- Usage:
You can find the new materials in your material browser in Hammer. Materials in the Extra Materials sub-module will need to be packed into a map using CompilePal or shared with your collaborators.
FGD Module
Requires: VPK: BAMF FGD Assets Hammer++
- Installation:
Paste the content of thetf-bamf/FGD/directory intoTeam Fortress 2/bin/.
Do NOT paste it intoTeam Fortress 2/tf/bin/.
Do NOT paste it intoTeam Fortress 2/bin/x64/.
In Hammer, open Tools → Options → Game Configurations, remove all existing Game Configurations, then addtf-brokk.fgdas the only new one. You do not need a separate Propper FGD to be able to use Propper. - Configuration: (Optional)
OpenTeam Fortress 2/tf/bin/tf-bamf.fgdin the text editor of your choice and adjust the options at the very start of the document. You can enable or disable the lines in the entity window there, among other things. - Usage:
Once installed, the FGD will work out of the box. You will notice more and improved entity keyvalues and descriptions in Hammer. See the Textureshadows page on how to use RadShadowMan to automatically enable textureshadows on all static props in your map.
Prefab Module
- Installation:
Drag the content of thetf-bamf/Prefabs/directory intoTeam Fortress 2/bin/Prefabs/. If that directory does not exist, create it. Make sure your Prefab Directory is configured correctly in Hammer/Hammer++ under Tools → Options → Game Configurations → Prefab Directory. - Usage:
In Hammer, select the Entity Tool. Select the category of prefab you want to place in the Categories dropdown menu in the bottom right. Select the prefab you want to place in the Objects dropdown menu just below. Place the prefab by clicking into the 3D Viewport, just like you would when placing a point entity. Move and rotate as usual.
All prefabs are grouped to make placement easier. Stay in Group Select mode to move the whole thing at once and press CTRL+B to align to the grid, if necessary. Most prefabs have a skip brush surrounding them for that purpose, which can be deleted once the prefab is placed correctly.
Game Mode Module
- Installation:
Drag the content of thetf-bamf/Gamemodesdirectory anywhere you want. - Usage:
You can open the VMFs in Hammer just like any other VMF. Copy what you need and paste into your map. Some game modes have additional files that you need to place properly.
VMF Module
- Installation:
Drag the content of thetf-bamf/VMFs/directory anywhere you want. - Usage:
You can open the VMFs in Hammer just like any other VMF.
Compile Configuration Module - CompilePal
Requires: CompilePal, duh
- Installation:
Drag the content oftf-bamf/Compile Configs/CompilePal/into the directory that contains your CompilePalX.exe. - Usage:
Compile your map using the BAMF TF2 Super Duper preset in CompilePal.
Tool - RadShadowMan
- Installation:
DragTools/Radshadowman/RadShadowMan.exeintoTeam Fortress 2/bin/. - Usage:
Compile
your map using the RadShadowMan configuration in either Hammer++ or CompilePal.
Tool - Propper
Requires: FGD
If you are not using Compile Configuration - CompilePal, you will need to create your own compile configuration.
- Installation:
DragTools/Propper/propper.exeintoTeam Fortress 2/bin/. - Usage:
Compile
your map using the Propper configuration in either Hammer++ or CompilePal.